1. Introduction
The SPECjEnterprise®2018 Web Profile benchmark is an end-to-end benchmark which allows performance measurement and characterization of Java EE 7 Web Profile application servers and supporting infrastructure such as JVM, Database, CPU, disk, network, and servers.
The workload consists of an end-to-end web based automotive insurance brokerage application processing web requests.
This document is a guide for setting up and running the SPECjEnterprise®2018 Web Profile benchmark. For a description of the rules and restrictions pertaining to a compliant run of the SPECjEnterprise®2018 Web Profile benchmark, we strongly recommend you read the SPECjEnterprise®2018 Web Profile Run and Reporting Rules document contained in the benchmark kit. For an overview of the benchmark architecture, see the SPECjEnterprise®2018 Web Profile Design Document also contained in the benchmark kit. The latest version of this and other mentioned documents are available at SPECjEnterprise®2018 Web Profile website
When using the name SPECjEnterprise®2018 Web Profile benchmark in this document we mean the SPECjEnterprise®2018 Web Profile Web Profile benchmark. This document is entirely focused on the web profile benchmark.
1.1. Terminology
-
SPECjEnterprise®2018 Web Profile WebjOPS
-
The SPECjEnterprise®2018 Web Profile performance metric and denotes the jEnterprise Web Operations Per Second completed during the Measurement Interval. "SPECjEnterprise®2018 Web Profile WebjOPS" is composed of the total number of business transactions completed per second.
-
-
Domain
-
A logical entity that describes a distinct business sphere of operations. The three SPECjEnterprise®2018 Web Profile domains are: Insurance, Insurance Provider and Vehicle
-
-
Driver
-
The client code that drives the benchmark, monitors requirements, and reports results.
-
-
SPECjEnterprise®2018 Web Profile Kit
-
The complete kit provided for the SPECjEnterprise®2018 Web Profile benchmark. This includes the SPECjEnterprise®2018 Web Profile Application, the Driver, load programs, and documentation.
-
-
SPECjEnterprise®2018 Web Profile Application
-
The implementation of the Components provided for the SPECjEnterprise®2018 Web Profile workload.
-
-
System Under Test (SUT)
-
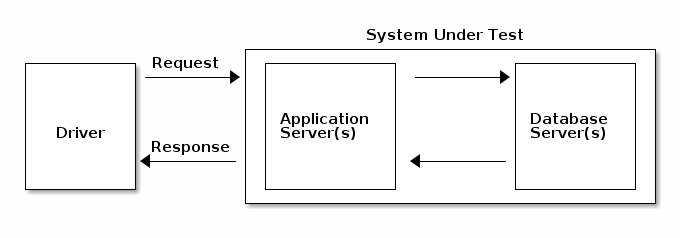
Comprised of all components that are being tested. This includes Application Servers/Containers, Database Servers, network connections, etc. The Driver is not part of the SUT.
-
1.2. Overview
The SPECjEnterprise®2018 Web Profile workload emulates an automotive insurance policy brokerage service. This workload stresses the ability to scale web requests to handle the complexities of memory management, connection pooling, passivation / activation, caching, etc. The SPECjEnterprise®2018 Web Profile Design Document includes a complete description of the workload and the application environment in which it is run. This section of the user’s guide describes the software and hardware environments required to run the workload.
1.2.1. Hardware Environment
Although the SPECjEnterprise®2018 Web Profile benchmark can be run on a single machine for testing purposes, compliance with the SPECjEnterprise®2018 Web Profile Run and Reporting Rules requires that the driver be run on one or more machines outside the SUT. Therefore, a compliant hardware configuration must include a network and a minimum of two systems – one or more systems to run the components within the SUT and at least one system to run the driver outside the SUT. A simple configuration is illustrated below.
1.2.2. Software Environment
The SPECjEnterprise®2018 Web Profile application is a Java EE 7.0 Web Profile application that requires a Java EE 7 Web Profile compatible application server as well as a Database to run as part of the SUT. A Java Runtime Environment (JRE) version 8 or later is required for the application server and the driver.
2. Installing the SPECjEnterprise®2018 Web Profile benchmark
The SPECjEnterprise®2018 Web Profile kit is supplied as a tar gzip that should be extracted by
-
tar xf SPECjEnterprise2018-Web-Profile-kit-1.0.0.tgz
The SPECjEnterprise2018-Web-Profile-kit-1.0.0 directory is the root directory of the kit after the tar gzip is extracted. We will call this top level directory KIT_HOME.
The SPECjEnterprise®2018 Web Profile benchmark can be run on any Application Server that is compatible with the Java EE 7 Web Profile Specification and has passed the Compatibility Test Suite (CTS) for that specification. The code is implemented in Java, and the tooling such as build and deploy infrastructure is implemented using Gradle build scripts.
2.1. Directory Structure
After extracting the kit, the key directories to consider are:
-
appservers
-
Application server specific build files and configuration
-
-
databases
-
Database specific build files and configuration
-
-
docs
-
A copy of the benchmark documentation
-
-
faban
-
Build files and configuration related to setting up the faban harness and running the driver
-
-
lib
-
Library jars that are used by the harness to run the workload
-
-
modules
-
Root directory of the different modules
-
-
modules/MODULE_NAME/src
-
Source directory for each module
-
-
modules/MODULE_NAME/build
-
Directory containing the built files and packages for each module
-
-
modules/MODULE_NAME/build/libs
-
Directory containing the built project archives for each module
-
-
reporter
-
Contains a properties template for report generation and a sample run result
-
2.2. Java Module Structure
Of the SPECjEnterprise®2018 Web Profile source files are located under a specific module. The modules are:
-
common-utils
-
Common utility files, used by multiple modules
-
-
faban-extensions
-
Extensions to the Faban framework needed by the driver
-
-
insurance
-
All the files for the insurance service
-
-
insurance-loader
-
Load program to populate the database before a run
-
-
insurance-provider
-
All the files for the insurance provider service
-
-
loader-lib
-
Common loader source files, used by the database load program
-
-
reporter
-
All the files for the reporter to generate a report from a benchmark run which is used for a submission
-
-
specjwebdriver
-
The driver that generates the benchmark workload
-
-
vehicle
-
All the files for the vehicle service
-
-
webprofile-harness
-
Benchmark harness used by Faban
-
3. Building and Deploying the SPECjEnterprise®2018 Web Profile benchmark
There are several components required to build and deploy the SPECjEnterprise®2018 Web Profile benchmark.
All dependencies required to build the benchmark are provided in the lib directory. In the kit all source files are already compiled, but re-compilation is possible if wanted.
Building and deploying the benchmark requires Gradle, which is supplied as part of the SPECjEnterprise®2018 Web Profile kit.
3.1. Services
The SPECjEnterprise®2018 Web Profile benchmark application consists of three different services: Insurance, Insurance Provider and Vehicle. Each service provides a set of business methods exposed through JAX-RS APIs or a web front end through JSF. Only the Insurance service has a JSF frontend that is used by the benchmark driver. The driver interacts with the Insurance service via HTTPS requests either against the JAX-RS endpoints or against the JSF endpoint.
Communication between the services are over HTTP using JAX-RS APIs. Each service uses a distinct set of database tables and calls business methods of its own service only. Hence it is possible but not required to setup a distributed environment e.g. using a dedicated (clustered) application server and a dedicated (clustered) database instance for each service. Please refer to Persistence Configuration to learn more about database access and alternatives for configuring data sources.
3.2. Build process
These steps must be accomplished prior to deploying the SPECjEnterprise®2018 Web Profile benchmark:
-
Configure the environment
-
Build the .jar and .war files
3.2.1. Configuring the benchmark environment
In order for Gradle to run correctly, you must have the JAVA_HOME environment variable set.
In the root directory of the benchmark kit, configure the gradle.properties file. The following properties need to be set for your environment:
appserver=<APPSERVER>
database=<DATABASE>
The values defined dictate the directories used to find the vendor specific configuration files and Gradle build scripts. These directories are organized as follows:
-
KIT_HOME/appservers/APPSERVER/
-
KIT_HOME/databases/DATABASE/
Some of these configuration files and Gradle build scripts are provided for products listed below, or you can use the default templates to create your own.
The provided vendor specific files for application servers are:
-
JBoss
-
WebSphere
The provided vendor specific files for databases are:
-
DB2
-
MongoDB
-
Oracle
-
PostgreSQL
3.2.2. Building the Web Archive (WAR) files
3.2.2.1. Repackaging the JAR and WAR files
The following command can be used to build the Java Archive (JAR) and Web Archive (WAR) files. Only one Gradle target needs to be called to build the jar and war files. The Gradle target calls the application server vendor specific build scripts which enable vendors to add or replace meta data configuration files delivered with the kit without recompiling the classes.
-
./gradlew repackage.artifacts
The above Gradle target is used to build submission compliant war files. Submission compliant war files must use the class files as provided with the kit, so this target does NOT recompile the source code.
For research or other unofficial testing purposes, it is possible to recompile the source code. Targets to recompile the benchmark code are below:
-
./gradlew clean
-
./gradlew build
If any errors occur at this step it is generally a setup / directory mis-match problem. Please review all settings carefully prior to contacting SPEC® for support.
Note : Running the Gradle clean and build targets will recompile classes and make the war files non-compliant with the Run Rules.
3.3. Deployment Process
The following sections cover deploying the insurance.war, insurance-provider.war, and vehicle.war archives created in the following folders:
-
modules/insurance/build/libs/insurance.war
-
modules/insurance-provider/build/libs/insurance-provider.war
-
modules/vehicle/build/libs/vehicle.war
Each Application Server is unique and it is beyond the scope of this document to provide exact instructions to complete the deployment. The war files are Java EE 7 Web Profile compatible and they have proved easy to deploy.
3.3.1. Create the Database(s)
For the benchmark, you can create a single database that houses all of the tables for the services, or the tables for the services can be distributed to separate databases.
It is beyond the scope of this user’s guide to provide guidance for the installation and configuration of the various databases available on the market. For convenience, the kit provides Gradle build targets to create all the tables needed and populate the tables with the required data based on the given injection rate. This works against all databases as long as a JPA provider is configured. The kit contains a few of these.
See section 2.4 of the SPECjEnterprise®2018 Web Profile Run and Reporting Rules for restrictions on modifications to the tables.
3.3.2. Topology Considerations
Each war file can be deployed into separate application server instances or two or more of them can be deployed into the same instance. The default configuration of the benchmark is that all three war files are deployed in an application server instance which is configured with hostname localhost and port 8080. In order to run the benchmark with each war file deployed in separate application server instances, it is required to update the modules/insurance/src/main/webapps/WEB-INF/web.xml file to set the insurance.provider.port and/or vehicle.service.port entries to the application server http port of the application server instance that is hosting the war file for that service. Similarly, the vehicle service port change need to be made to the modules/insurance-provider/src/main/webapps/WEB-INF/web.xml file. If the insurance-provider.war and/or vehicle war files are deployed on a separate host from the insurance war file, the host configuration insurance.provider.host and vehicle.service.host in those same files will also need to be updated.
3.3.3. Transport Layer Security
To do a compliant run of the SPECjEnterprise®2018 Web Profile benchmark, Transport Layer Security (TLS) is required to be enabled. The benchmark includes a trust store file at modules/specjwebdriver/src/main/resources/specj.keystore.jks. The application server instance(s) hosting the insurance.war file must be configured to use the certificates in the trust store in order to enable https traffic to the application server. The benchmark uses the TLS_ECDHE_RSA_WITH_AES_128_GCM_SHA256 cipher suite. It is required that the application server be configured to support this specific cipher suite.
-
If you are deploying each war file into separate application server instances, only the application server instance(s) where the insurance.war file is deployed needs to have TLS enabled. Communication between the insurance service and the insurance provider and vehicle services does not require transport layer security.
3.3.4. Persistence Configuration
Database table/column to JPA entity/field mapping
-
The JPA entities assume upper case names for tables and columns. According to the SQL93 standard it is assumed that the reference schema scripts generate appropriate upper case table and column names. However if there are upper/lower case issues or your database has limits on table or column name lengths you could use the JPA orm.xml to change the mapping.
If preparing for a submission, the configuration of the data sources must comply with the SPECjEnterprise®2018 Web Profile Run and Reporting Rules.
-
Typically the database isolation level is READ_COMMITTED because the minimum isolation of the SPECjEnterprise®2018 Web Profile benchmark (and JPA) is (strict) READ_COMMITTED.
-
Persistence units in persistence.xml can refer to the same data source connecting to a single database instance holding a schema which contains the tables and data for all three SPECjEnterprise®2018 Web Profile services. This could be achieved in a vendor specific way by using the JPA data source names of persistence.xml as aliases for your data source.
-
More sophisticated setups use different data sources e.g. for connecting to different database instances. In this case each database instance might contain the data of one or more services.
-
The example persistence.xml files that are provided use data sources with JNDI names of jdbc/SPECj<domain>DS (<domain> = Insurance, InsuranceProvider, Vehicle). You will need to define these data sources in your application server configuration.
4. Running the SPECjEnterprise®2018 Web Profile benchmark
Running the SPECjEnterprise®2018 Web Profile benchmark requires that the database is populated, application server available and the driver is configured for your environment.
4.1. Loading the Database(s)
The only way to load the tables is through a Java program using JPA to load the tables. The database used is specified with the database property defined in the gradle.properties file.
The Injection Rate (IR) is a measure of how much data will be loaded for use during the benchmark run. A higher injection rate equates to more client load, and therefore more data is created accordingly. Details regarding the mathematical relationship between Injection Rate and real tables sizes can be found in the SPECjEnterprise®2018 Web Profile Run and Reporting Rules.
The following property in the properties file KIT_HOME/gradle.properties controls the loading process:
-
benchmark.txrate Injection Rate
Hint: To save time between runs the restoring of a database backup will be quicker compared to using the Gradle loader tasks.
4.1.1. Database Load Program
The properties in the property file KIT_HOME/databases/DATABASE/database.properties are used by the database load program:
-
database.insurance.driver
-
database.insurance.uri
-
database.insurance.user
-
database.insurance.password
-
database.insurance-provider.driver
-
database.insurance-provider.uri
-
database.insurance-provider.user
-
database.insurance-provider.password
-
database.vehicle.driver
-
database.vehicle.uri
-
database.vehicle.user
-
database.vehicle.password
The following target creates the database tables and populates them using the configured Injection Rate:
-
./gradlew load.database.jpa
4.2. Starting Application Server and Validating deployment
With the benchmark application deployed and database server populated, you can now start your application server instance(s).
To validate that the benchmark application is functioning correctly, navigate to:
where
-
HOST is the host name of the application server instance where insurance.war is deployed
-
PORT is the port of the application server instance where insurance.war is deployed
A successfully deployed application will display the SpecjEnterprise®2018 Web Profile insurance login page.
4.3. The SPECjEnterprise®2018 Web Profile Driver
Configuring the driver properly requires understanding how the driver works, which is described below. The SPECjEnterprise®2018 Web Profile Driver consists of a Java program and is designed to run on one on more client systems, using an arbitrary number of Driver Agents to ensure that the Driver has no inherent scalability limitations. Note that none of the client systems are part of the SUT. The SPECjEnterprise®2018 Web Profile benchmark uses the Faban testing Harness to control the Driver Agents. See the Faban documentation for an Overview.
4.3.1. Driver Components
-
Master / Harness
-
This is the machine from which you control the benchmark run. It can also be used to run Agents. The benchmark run can either be started using the Faban Harness web user interface or using Gradle scripts to invoke the harness command line interface.
-
-
Driver
-
This is a load generator implemented using Faban benchmarking API framework. It provides the client Driver behavior necessary to exercise the deployed Java EE Web Profile benchmark application on the SUT. The Driver consists of one or more Agents.
-
-
AgentBootstrap
-
On each machine is a Bootstrap process. The Bootstrap receives commands from the Harness to coordinate the run. The commands launches required Services or Driver Agents processes.
-
-
Agents
-
These are the client system processes on which the various Driver workloads run. The Master machine can also participate as an Agent client.
-
-
Registry
-
There is one Java Registry which runs on the Master machine. All the Agents and Harness register with the Registry.
-
4.3.2. How The Driver Works
The benchmark harness uses Faban to schedule and automate benchmark runs. Faban also provides an embedded graphing tool that can map and compare run results. Additional information about the harness can be found at Faban Website. The harness runs as a web application hosted on a Tomcat server. It provides a web user interface and acts as a container for the driver components of the SPECjEnterprise®2018 Web Profile benchmark. The web user interface provided by the harness is used for scheduling runs, managing runs, viewing run logs, and viewing the results once the run is finished (including detailed graphs).
The harness, the driver, and all agents communicate using RMI. The harness reads the run configuration and starts the master driver and the driver agents, distributing load to the driver systems as appropriate. The driver also reads the run configuration and configures the driver agents appropriately. The number of threads is determined by the scaling rules of the benchmark and are equally distributed amongst all driver agents. Each thread runs independently, executing the workload according to the rules defined in the benchmark. When the run completes, the master driver coordinates with the Agents to retrieve all the statistics and presents the user with the results. The harness also post-processes the results and presents the user with several charts showing the behavior during the runs and other statistical validations.
4.4. Configuring and Running the Driver
4.4.1. Using the Faban test harness
4.4.1.1. Setting up the Faban test harness
To start the harness server, run:
-
./gradlew faban.harness.start
At this point the harness has not deployed the benchmark.
To deploy the benchmark run:
-
./gradlew faban.harness.deploy
To stop faban run:
-
./gradlew faban.harness.stop
4.4.1.2. Faban Harness User Interface
The Faban harness exposes its user interface through a web browser. Once the harness is setup, point your web browser to http://host:9980/ to view the user interface. Click on "Schedule Run" on the left hand menu to start a run. The first time you schedule a run you are asked to create a profile. Profiles allow you to save different configurations for running the benchmark. At any time only one benchmark configuration is run.
Change the run parameters on the user interface as needed. These parameters are picked up from the run.xml and can be edited. You should see some descriptive text for each of the configuration parameter with a mouse hover on the text box. Once edited the run parameters are persistent across runs.
There are currently three tabs available on the harness UI:
-
Java: allows you to specify the java executable for the driver & some JVM options including heap sizes and agent classpath.
-
Driver: allows you to configure the run configuration for the insurance driver.
-
For running with multiple agents, potentially on remote systems, provide a space separated list of host names in the Host edit box. Also for the driver, change the number of agents appropriately. The Driver protocol needs to be set to https for a run compliant with the Run and Reporting Rules.
-
-
Servers: allows you to specify the Insurance and Vehicle service host names and ports.
Once all your edits are done, click on the "Ok" button to start the run. The run can be monitored by clicking on the run id presented after the run has been submitted. Alternatively you can also navigate to the run using the "View Results" menu and selecting the appropriate run id (arranged in the order of newest to oldest). Once a run is completed, you can see the summary results by clicking on the "Summary Result." To view the various graphs click on the "Detailed Results" link (appears a bit after the run completes). To review the run configuration click on "Run Configuration". System statistics can be viewed under "Statistics".
4.4.2. Gradle tasks for starting a run:
For the purposes of preparing for a result submission the following Gradle targets are provided. For starting/stopping a run:
-
./gradlew faban.cli.run
-
./gradlew faban.cli.killrun
The Gradle targets are currently by default meant to be used from the system on which the harness is installed. If on the harness you have a profile other than "specj" that you would like to use, make sure to change it. Note: to generate a run suitable for submission the faban.cli.run must be used. This generates files the reporter depends upon to operate. See Submitting SPECjEnterprise®2018 Web Profile Results.
The benchmark configuration for the gradle task is based off of the content of the faban/web-profile-run.xml.template file.
Configuration options for a run started via Gradle are below.
-
The jvmOptions for the agent are set in the faban/driver.properties file using the property faban.agent.options
-
The JDK used will be the one that is used by gradle based off of your JAVA_HOME environment variable
-
The host setting for the driver is a space separated list of host names in the faban/driver.properties file, using the property faban.driver.hosts
-
The transaction rate is set in the gradle.properties file using the benchmark.txrate property
-
The insurance and vehicle host names and ports are set in the appservers/appserver.properties file
Note: To change the ramp up, steady state, and ramp down settings you will need to manually edit them in the web-profile-run.xml.template file. You will need to do something similar for the protocol setting if you want to use the http protocol.
4.4.3. Driver Configuration Tips
If no <driver host> is specified the default local host is used.
If using multiple driver hosts, please ensure that the JDK and benchmark installation are in the same directory structure as the Master across all host machines running the benchmark. The Master must have rsh or ssh access, without password verification, to the host machines.
4.4.4. Live Statistics
The live statistics is used to monitor whether the benchmark run is progressing according to expectations. You can turn the live stats feature on by setting the following parameters in the web-profile-run.xml.template file:
<fd:runtimeStats enabled="true">
    <fd:interval>300</fd:interval>
</fd:runtimeStats>
Or in the web user interface, set the "Run time Stats" to true and "Run time Stats Interval" to the desired interval in Driver Configuration of the Driver tab.
This will result in run statistics being printed out at 300 second intervals in the run log after the start of the run (this is when the log says "Ramp up started" including during ramp up). For printing stats at a different interval, change the interval value. The output format is explained based on the example below:
INFO: 600.61s - InsuranceDriver: JSF - Accept Quote/JSF - Accept Quote + WebSocket/JSF - Add Vehicle/JSF - Delete Vehicle/JSF - Login/JSF - Logout/JSF - Register/JSF - Register Invalid/JSF - Unregister/JSF - Update User/JSF - View Insurance/JSF - View Quote/JSF - View User/JSF - View Vehicle/REST - Accept Quote/REST - Accept Quote + WebSocket/REST - Add Vehicle/REST - Delete Vehicle/REST - Login/REST - Logout/REST - Register/REST - Register Invalid/REST - Unregister/REST - Update User/REST - View Insurance/REST - View Quote/REST - View User/REST - View Vehicle CThru=216.011/53.536/283.406/107.606/990.206/935.736/90.449/22.987/58.967/112.936/102.642/282.507/169.604/372.622/1220.842/305.227/1579.138/613.452/5579.838/5262.085/513.542/128.294/312.456/639.604/583.003/1576.673/950.928/2108.972 OThru=62.397/16.420/59.113/44.335/348.112/361.248/24.631/3.284/21.346/44.335/37.767/87.028/67.323/124.795/410.509/95.238/527.094/223.317/2073.892/1863.711/160.920/44.335/121.511/215.107/211.823/551.724/326.765/750.411 CErr=0.000/0.000/0.000/0.000/0.000/0.000/0.000/0.000/0.000/0.000/0.000/0.000/0.000/0.000/0.000/0.000/0.000/0.000/0.000/0.000/0.000/0.000/0.000/0.000/0.000/0.000/0.000/0.000 CResp=0.029/0.042/0.047/0.015/0.011/0.003/0.023/0.031/0.010/0.020/0.009/0.019/0.012/0.011/0.023/0.035/0.024/0.010/0.002/0.000/0.004/0.010/0.007/0.009/0.003/0.009/0.004/0.003 OResp=0.023/0.039/0.047/0.012/0.013/0.003/0.029/0.051/0.015/0.021/0.008/0.021/0.014/0.011/0.018/0.032/0.024/0.009/0.002/0.000/0.004/0.010/0.005/0.009/0.003/0.009/0.004/0.003 CSD=0.029/0.035/0.016/0.014/0.008/0.004/0.095/0.052/0.009/0.012/0.007/0.012/0.019/0.000/0.031/0.029/0.000/0.000/0.000/0.000/0.000/0.000/0.006/0.000/0.002/0.025/0.007/0.007 OSD=0.009/0.013/0.012/0.006/0.007/0.003/0.017/0.000/0.014/0.009/0.004/0.010/0.007/0.008/0.011/0.013/0.009/0.009/0.003/0.000/0.006/0.009/0.004/0.007/0.003/0.006/0.005/0.005 C90%Resp=0.040/0.070/0.070/0.020/0.030/0.010/0.040/0.050/0.030/0.040/0.020/0.040/0.030/0.020/0.040/0.050/0.040/0.020/0.010/0.010/0.010/0.020/0.010/0.020/0.010/0.020/0.010/0.010 O90%Resp=0.040/0.070/0.070/0.020/0.030/0.010/0.040/0.050/0.030/0.040/0.020/0.040/0.030/0.020/0.040/0.050/0.040/0.020/0.010/0.010/0.010/0.020/0.010/0.020/0.010/0.020/0.010/0.010
These statistics are interpreted as follows: At 300 seconds from start of the run, the InsuranceDriver is reporting statistics for the operations.
-
CThru - current throughput (as of the last interval period)
-
OThru - overall measured steady state throughput
-
CErr - current error rate (as of the last interval period)
-
CResp - current response time (average of the last interval period)
-
OResp - overall average steady state response time
-
CSD – current standard deviation of the response time (as of last interval period). This number is interpreted in the context of the current response time and does not contribute to the overall standard deviation without taking the current response time into account.
-
OSD – overall standard deviation of the response time
-
C90%Resp - current 90th% response time as of last interval period
-
O90%Resp - overall steady state 90th% response time
4.4.5. Logging Configuration
By default, the SPECjEnterprise®2018 Web Profile benchmark comes with logging pre-configured at level INFO. To change the log level, edit the file KIT_HOME/faban/harness/faban/config/logging.properties. Log levels are defined by the Java logging facilities, and are as follows: SEVERE, WARNING, INFO, CONFIG, FINE, FINER, and FINEST. Setting the log level to FINER or FINEST for the whole system would generate a large amount of output. It is recommended to enable such logging only for specific subsystems that need more detail. For example, to enable logging at level finer for the InsuranceDriver, add the following line to logging.properties: org.spec.jent.driver.insurance.InsuranceDriver.level = FINER
For further information on logging configuration and logging.properties file format, please refer to the Java Logging Overview. When a run is started, the Faban Harness will automatically distribute the configuration added to logging.properties to every Driver Agent.
4.4.6. Auditing
During auditing the driver executes some tests before the workload is started to verify that a few important rules defined in the Run and Reporting Rules are met. By default, the run will not stop if an audit test fails. To change the default so that the run will stop if an audit test fails, set the flag stopIfAuditFailed in faban/web-profile-run.xml.template to true. For testing purposes auditing can be skipped by setting the audit flag in faban/web-profile-run.xml.template to false.
4.4.7. Diagnostic Logging by the Driver
Low level logging of requests and responses by the driver is available by configuring the properties htmlOutput and/or debugOutput to true in the run.xml file used to execute a run.
<htmlOutput>true</htmlOutput>Enable tracing of html requests and responses
<debugOutput>true</debugOutput>Enable Exception logging when an Exception has been detected when processing a request or response
Generated logging files can be found in this directory
<KIT_HOME>/faban/harness/faban/logs
Note: Enabling these properties for a run will generate large files. Also the resource consumption of the client machines will be affected.
4.4.8. Troubleshooting
In order to get a valid run please reload the database and restart your application server before starting the driver.
The database has to be reloaded since the driver executes some checks during auditing including table row size.
For further troubleshooting, please refer to the Frequently Asked Questions ( FAQ )
5. Submitting SPECjEnterprise®2018 Web Profile Results
The Submission Template File contains a detailed description of the SUT in text format that is used by the SPECjEnterprise®2018 Web Profile reporter to produce a report suitable for publication.
To create a SPECjEnterprise®2018 Web Profile Submission File:
-
Start with the jEnterprise.webprofile.properties Submission Template File provided in the directory:
KIT_HOME/reporter/sample
-
Edit the fields to describe the details of your SUT. A detailed description of each field and example are provided in the sample file. For field requirements, please refer to Section 4.1 of the SPECjEnterprise®2018 Web Profile Run and Reporting Rules.
-
Supply this file to the report generation scripts as described below. The contents of this file will be included in the final submission properties file.
5.1. Generating a Report
The SPECjEnterprise®2018 Web Profile benchmark includes a utility, called the reporter, for generating a Submission File. Before attempting to use the reporter utility you must have created a successful run using the provided Gradle task. See Gradle tasks for starting a run. Only the faban.cli.run Gradle task can prepare for report generation (not the Faban Web UI). The report contains a summary of the key results and a complete system description in a format designed to be consistent with other SPEC® reporting pages. In addition to this submission file a sample report is generated which simulates the appearance of the report on the SPEC® results website.
-
./gradlew reporter.run
This Gradle task will run the reporter using the latest run results from the faban.cli.run Gradle task. The reporter will write to the currently configured output directory. The default output folder is reporter/sample.
To run the reporter by hand, use the following command:
$ java -classpath modules/reporter/build/libs/reporter.jar reporter [-a] [-r] jEnterprise.webprofile.properties <result output directory>
Where:
-
jEnterprise.webprofile.properties is the Submission Template File created in the previous step.
-
<result output directory> is the path to the results directory for which a report should be generated, not including a trailing path separator.
Output:
-
Submission properties file
This file is to be submitted via the SPEC® submission process outlined below.
KIT_HOME/reporter/<filename>.submission.properties
-
Sample report
An HTML file named <filename>.report.html is created by default.
The "-a" option will create a text report page named <filename>.report.txt and the "-r" option will write the output to the result output directory:
KIT_HOME/reporter
5.2. Submitting the Results
Once you have a successful run, you can submit the results to the SPEC® OSG Java subcommittee for review. To submit a result:
-
Create a configuration diagram (in PNG, JPEG or GIF format) for your SUT (see SPECjEnterprise®2018 Web Profile Run and Reporting Rules section 4.3 for a description of the Configuration Diagram).
-
Create a Full Disclosure Archive (in ZIP format) with the results of your run (see SPECjEnterprise®2018 Web Profile Run and Reporting Rules section 4.2 for a list of the items in the Archive).
-
Create a Submission File as described in Section 5.1 above. The Submission File should contain the file name for the Configuration Diagram and the Archive.
-
Put just these three files into a single archive file (in TAR format).
-
Mail this single archive file as an attachment to subjenterprise2018web@spec.org.
Every submission goes through a minimum two-week review process, starting on the next scheduled review period. During the review, members of the committee may ask for additional information or clarification of the submission. Once the result has been reviewed and accepted by the committee, it may be published on the SPEC® web site at http://www.spec.org/.
Appendix A: Gradle tasks
The following is a list of commonly used Gradle tasks and a brief description of their purposes.
| Target | Location | Description |
|---|---|---|
build |
Generates the insurance.war, insurance-provider.war, vehicle.war and driver.jar file |
|
clean |
Removes all output generated by this build. For example: all jars in the build/libs directory will be deleted. |
|
driver.jar |
KIT_HOME/modules/specjwebdriver/specjwebdriver.gradle |
Generates the driver.jar file |
faban.cli.killrun |
KIT_HOME/faban/faban.gradle |
Stops the benchmark using the faban command line interface |
faban.cli.run |
KIT_HOME/faban/faban.gradle |
Starts the benchmark using the faban command line interface |
faban.harness.deploy |
KIT_HOME/faban/faban.gradle |
Deploys driver on the Faban harness |
faban.harness.install |
KIT_HOME/faban/faban.gradle |
Installs the faban harness on the current system. |
faban.harness.start |
KIT_HOME/faban/faban.gradle |
Starts the faban harness on the current system. |
faban.harness.stop |
KIT_HOME/faban/faban.gradle |
Stops the faban harness on the current system. |
load.database.jpa |
KIT_HOME/databases/database.gradle |
Loads the database using the standalone database JPA loader |
repackage.artifacts |
KIT_HOME/build.gradle |
Builds submission compliant jar & war files |
reporter.run |
KIT_HOME/modules/reporter/reporter.gradle |
Runs the reporter using the results from the last run |
Product and service names mentioned herein may be the trademarks of their respective owners.
Copyright © 2001-2018 Standard Performance Evaluation Corporation
All Rights Reserved